Beach Waves…

Fekkai – Heat Activated Wave Spray:

IMG_0524


I find some of Frederick Fekkai’s Hair Products to be great, this one is his heat activated Wave Spray which works by misting it onto the damp hair and using a hair dryer to create a tousled, ‘beachy’ look, by shaping it with your fingers while it dries.


I didnt love this one as much as some of Fekkai’s other stuff, I found it left the hair with abit of a dry and coarse feeling afterwards, with the hair frizzing quite easily. Some of his curly hair products gave my hair a much nicer softer beachier feel than this one did. Maybe this one might work better on finer hair?

Dekko’s Daily Grind – Katie

So here’s Katie who came to Dekko salon with her long overgrown hair, Katie’s hair is naturally curly at the back of the head and then the front and sides are pretty straight. She wanted to have something that could could wear curly or straight.


We kept Katie’s hair on the long side but decided to cut the layers to a medium length. With the front area, we made it much more definite so that the straighter hair could form a stronger look with or without blow-drying. I always think with this type of hair, its much better to have it straight on the front areas rather than the other way round of having it straight at the back and curly at the front, which would make it very hard to control. After the cut, we blow dried the hair straight, using a straightening balm to help smooth the ends more and to hold it in place. Here’s Katie after the cut, she definitely looks alot cuter don’t you think?


Thanks alot Katie for posing for me…

Dekko’s Daily Grind..Kim

Another dose of ‘before and after’ styles from Dekko Salon. Our clients are so great for letting me take photos to show different looks for my blog – Thanks again for all your help.
I’ve been cutting Kim’s hair for over 10years now and she has always been very creative with her haircuts over the years, just recently we have been keeping Kim’s hair on the longer side. So this is Kim after not having a haircut for over 5 or 6 months. That’s because she’s abit of a gypsy and has lived all over the States, right now she comes all the way from Chicago : )

We decided to keep the hair on the longer side but ‘chop’ all the rest of it up with shorter layers and a shorter front area, so that if she decides to tie her hair up, it still looks like a cute short haircut on top. We razored the hair throughout as Kim’s hair is very thick and coarse. We then styled it using a styling cream for hold and dried it while twisting the hair into big sections, creating a messy textured look. Thanks Kim!

Cool Mops Of The Week

HAPPY 4TH of July !!
Enjoy another round of Cool Mops around town. Thanks to all the girls who posed for me – Kerina, Helen, Joanna and Michelle. You all look great.

If you see any cool mops around, please feel free to send me some pictures and we can post them to showcase the styles!!
jules@juleschan.com

Jin Bang from Prive at Dekko Salon

Every now and again we at Dekko are lucky enough to get some outside teachers sent our way to give us inspiration and show us some new techniques.
Jin Bang, Artistic Educator from Prive Salon (LA & NY) came over to give us a demo on 2 models. The stylists had requested he show us a long layered haircut (always useful on our clients) on one model and the other model, a creative look.

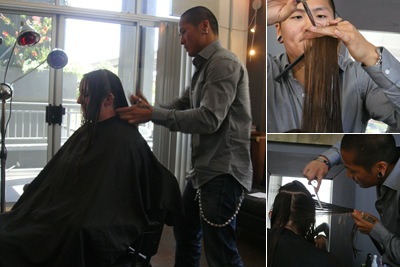
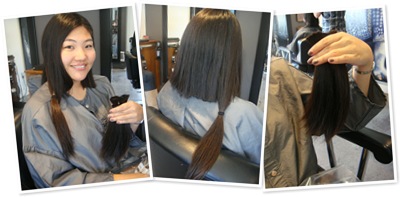
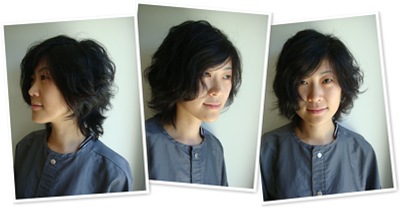
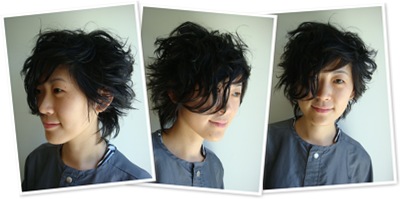
Here’s Jin working on Kayleigh with his creative techniques. He showed a variation of how to remove bulk from the hair and adding lots of texture to it.

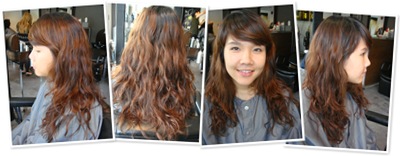
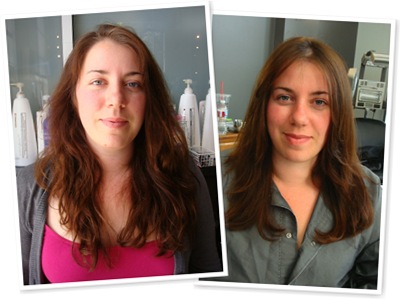
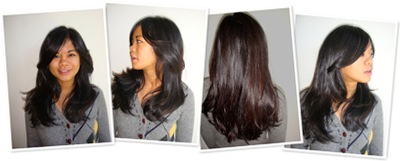
Before and after pictures of Sharon, His long layered haircut (the Kim K. as Jin would call it)(as in Kim Kardashian)! Starting with the base line to get the desired length, then he went to the front area and carved out a ‘C’ curve into the side areas. Lastly, the layers were picked straight up from the head and angled from short to long then blowdried using a round brush to create the body.

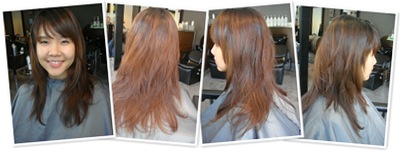
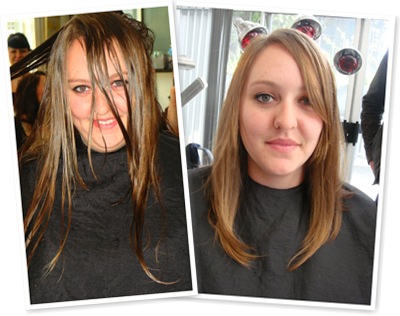
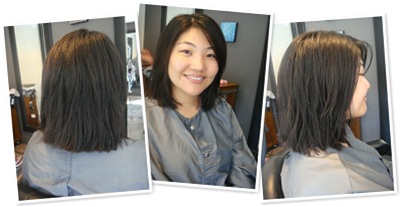
And here is before and after pictures of Kayleigh again, Jin’s creative haircut as seen in the above pictures. Jin started working from the inside out, starting with the internal layers and taking lots of bulk out with his new techniques before cutting the length off (using a back-cutting technique). He then went into the front area and sliced the front off, then returning to the sides, he connected the back length to the sides, keeping the sides longer. he continued to remove bulk throughout the layers through the top area too. Once the blow dry was completed, Jin returned into the whole haircut and refined any unwanted long areas of hair.

Both models looked great and we were very inspired by Jin, Thank You so much for ‘popping’ over and showing us a thing or two!

Dekko’s Daily Grind – Cathy

I wanted to feature some work from one of our other stylists from Dekko Salon. Joni Shibata Philips has been with the company since it started and here she is with Cathy, about to do quite a drastic change.

Cathy came in with long thick hair and wanted to donate her hair to Pantene’s Beautiful Lengths, I wrote an earlier post on Donating Hair and if you want to re-cap follow this link: https://jujuchan.com/2009/03/hair-donations.html

Most companies are quite strict and need at least 10 inches before they will accept the hair, but at least this one does accept colored hair, whereas some of the other companies needs the hair to be in its ‘virgin’ state. Cathy being the ideal candidate anyway, came in to see Joni and I couldn’t resist documenting the change for you.

Here’s Cathy during the ponytail cutting section:

Joni cut the hair just below the shoulder and because the hair is so heavy and thick, she proceeded to layer it through and took LOTS of weight out of it to ensure that the hair is able to move and that it will be easy to keep. The hair was then blow-dried and a pomade was rubbed into the ends to give it a chunkier finish to the layers. Here’s Cathy looking very fresh with her newly shorn locks.

Thanks Cathy for posing for the photos : )

Dekko’s Daily Grind – Meng

Here’s some more work from Dekko to share with you…

The very first time Meng came into Dekko to see us, she had long hair, the texture looked fairly straight and it was slightly frizzy. We actually chopped all the hair off that first time and revealed some fabulous curls that had been hidden away underneath all the weight of the hair. Here’s a photo of Meng before we attacked her with the scissors!


Meng - long

Because we did the haircut before I even started writing my blog the starting point with the before and afters below start at the grown out length of that first haircut.
Here’s Meng after her hair had grown out about 4months, I know she still looks cute but the length again made it look frizzy again and the shape was lost and heavy looking.

We cut the hair using both a razor and scissors. The back area was taken in more but left long enough to see from the front view. We decided to work on an asymmetric shape through the front area. The whole of the head was chopped into and texturized to give the curls more freedom to stick out and do whatever it wants!

We styled Meng’s hair with Davines’s Invisible Styling Paste, rubbing it into the ends so the ends stick together more and using a diffuser we dried the hair without disturbing it too much. Once dry, we messed the hair up and shook it around abit.


Thanks to Meng for being such a great model!

Modern Curly Perm….Maria

Here we have another perm done by Jodi Ninomiya from Dekko Salon, this time we have a much curlier look.
Maria came in with wavy-ish hair, and wanted to have a change of texture. After the consultation, both Maria and Jodi decided that a much curlier spiral look would be better than a soft perm as Marias hair is quite heavy and thick. I would like to add that personally i think Maria looked so good with both hair textures because she wears her hair well with her style of clothing and confidence that Jodi had her job made abit easier because of this factor…
Here’s Maria before the perm..

As mentioned Maria has wavy hair already, her front area was a little bit too short to perm so Jodi wove it out to blend with the parts that would be permed. The perm solution that Jodi used was by Goldwell – Definition for Normal Hair. She used 2 different rods, white and orange colored and it was left to process for 20 mins. The perm rods were positioned in a downward spiral.

As we all know with curly hair, it is so important not to disturb the curls while it is drying, this will ensure you have a definite prominent head of non-frizzy curls. Use a curling cream of some kind and either use a diffuser or leave it to air-dry, the diffuser usually gives abit more lift.


She looks great doesn’t she? Well done Jodi and thanks to Maria for letting me post her looks to share with you all.

Maggie Q

Maggie Q – International Star – most memorable to date, being Mission Impossible III.


I made this slideshow because even though I think Maggie’s style in hair is a little on the classic side, she wears the styles well. With a face like hers you certainly cant go wrong with any style really but being an actress I guess staying basic and classic is the way to go. Enjoy my selection : )